Monday, November 30, 2009

Gloves on demand


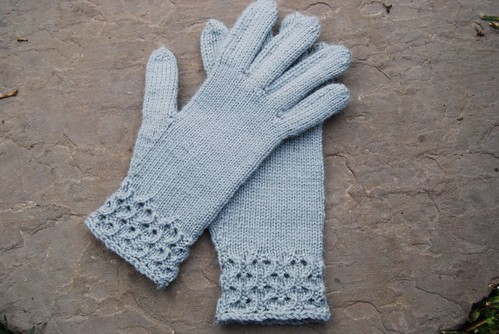
Bugg arrived home for Thanksgiving break with a goal in mind. She intended to head back to school with a pair of handknit gloves to keep her hands warm.


I was skeptical at being able to pull off the task while planning the holiday dinner and all of the other tasks that had me trailing behind that busy week.


Hubs and FYS often comment about my ability to 'whip something up' pretty quickly, so with that boost in confidence, I embarked to make her gloves.
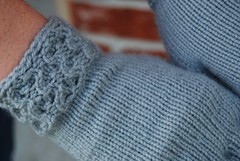
This pattern is Hourglass Eyelet Gloves from Webs. I used 2 skeins of Valley Yarns Sheffield and the yarn is wonderful to knit.
Construction of this pattern is a little unique in that the fingers are all knit as an i-cord and closed by picking up a row of stitches along the ladders created in the back of the fingers. Once finished with this, the fingers are connected and the hand is knit in the round. Easy enough, but I prefer the more finished look of traditional knit gloves.
Bugg was happy and tucked them into her bag while one was still a little damp. She called to let me know it is c o l d at school. Just knowing she will slip these gloves on to keep her hands toasty warms my heart.

Friday, November 20, 2009

This is all I got

Really, work needs to be completed on the Christening gown for Mallory. A little change was made to the pattern and overall, I don't think it will have as big of an effect as originally thought. It will be impossible to tell until it is blocked. Blocking seems far far off at this point.


Real progress has been made on the second Lana Grossa model. It is knit in LG Baby Alpaca which is super soft. It has a little halo fuzz to it, but just enough. The back and left front is finished, the right front is to the armhole decrease.


The front photo shows the true color of the yarn.


I took a time out Monday in the hopes of getting my curtains made before this weekend.
Chuckle chuckle.

This fabric is beautiful! It is silk with organza ribbon sewn throughout. It really brings the room together and adds interesting texture.
My first experience with interlining was successful and it adds body to the silk that I couldn't have imagined. They are extremely heavy.


I was able to nearly finish one panel and buy new rods. There are cool finials, but my son needs to cut the rods down first.
There are also round hold backs, but no time to monkey around with them until they looked good. Those will most likely wait until the other 3 panels are finished for a decision.
I also have some fabulous beaded trim. If the hold backs work, the trim will look wonderful down the inside of the panels.


So, that's all I got. Many things to do and nothing really finished.
What did you make this week?

Thursday, November 12, 2009

Modeled photos of that soft little vest

I adore this vest. FYS took photos for me this morning. I can definitely see many opportunities to wear this!


Linea Rossa No 2, Model 5. Knit in Lana Grossa Come (which is ultra soft and wonderful to wear - Highly recommend!!)
US 5 needles
It took every inch of 8 skeins


Monday, November 09, 2009

Supplies and steps for making that yarn wreath

You are going to have so much fun! It helps to have a friend nearby to hold things in place, twist the wires, or squirt the glue.

Supplies used for this wreath:


1 wire wreath


1 decorative garland - here is an example from Michaels. Just make sure it can be twisted to cover the entire wire wreath and has branches that can be twisted and bent to fill empty spots


Styrofoam balls:

2 Large
6 Medium
8 Small
6-8 Extra Small

Ornaments:
2 specialty - we used green fuzzy with gold circles
6 plain green
5 gold glitter
8 green glitter

Glue gun
Glue for glue gun
Craft glue
Pins
Floral wire
wire cutters

Yarn in miscellaneous colors and textures
We used:
Moss green

Pea green

Spring green

2-ply fuzzy
*we also separated the 2 ply and used each by itself then used the fuzzy ply with the spring green. This brings in different colors and textures throughout the wreath

Directions:
1. Cover your table with paper
2. Place the wire wreath form on the table with the curved edge toward you


3. Position the decorative garland into the wreath and wire around using floral wire


4. Spread the decorative branches so they will show after the ornaments are attached

5. Using Styrofoam ball of your choice and yarn of your choice, place some glue on the Styrofoam ball attach yarn and begin to wrap the yarn around the Styrofoam making a yarn ball. Be sure to cover the entire area so nothing shows through the yarn. Secure the end of the yarn with a pin and glue the end down (this end will not show). Allow glue to dry
6. Continue wrapping Styrofoam balls with different yarns

7. Cut 8" lengths of floral wire (these will be used to secure the yarn balls to the wire wreath)

8. Push a wire length underneath 7 or 8 yarn threads on the glued and pinned side of each yarn ball. Twist the wire ends a couple of times to secure

9. Position the yarn balls in a varied pattern around the wreath (it might help to take a digital photo once you get them into a position that you like)

10. Begin wiring the yarn balls around the wire wreath saving some of the small and extra small ones aside


11. Cut appropriate lengths of wire for ornaments

12. Loop wire through ornament hook and secure them to the wire wreath in a varied pattern around the yarn balls

13. Use glue gun sparingly if necessary to hold ornaments in place. Glue will show on yarn so make sure it is tucked behind the ornaments when you use it

14. Arrange remaining small and extra small yarn balls to fill in gaps or on top for dimension

15. If desired, cut twigs from the decorative garland and reposition to fill in any gaps

16. Use floral wire to form a strong loop on the back top of your wreath. This will be used to hang your wreath on a nail or wreath hanger


We took turns holding the wreath up and standing back to determine where fill-in ornaments were necessary. If your wreath will be in the weather, you may consider spraying it with a protective layer sold at craft stores.

Don't forget to send a link to your wreath, Ang and I would love to see it!

Saturday, November 07, 2009

Make a yarn wreath

Remember those cool wreaths decked out with yarn? Starbucks had them last year, but were too stingy to sell them. That was very unfortunate because we were in the middle of a major cross-country move and all of our Christmas decorations were MIA. It was one week before Christmas when we arrived to our new City and it would have been nice to have had a ready-made yarn wreath.

The wreaths caught attention of the knitters I know and my friend, Angella, decided to do something about it.
She found a blogger who posted about making her own wreath. Using Kara's information as a guideline, Angella gathered her supplies and we got together.


We had a goal, one besides hanging a finished masterpiece. Ang is hosting a wreath making party later this month and we wanted to be able to test the theory and make a list of the supplies needed for her size of wreath. We were skeptical that all of this could be accomplished with just a glue gun. Withstanding actual use for the entire season was a concern and we decided to enhance the stability with floral wire. We used a lot of floral wire.

I wish we had taken more in-process photos and I will at the party. In addition, I will post a list of supplies.
The result was incredibly beautiful. My color scheme is already chosen and I will be picking up things to put into my very own wreath.

Friday, November 06, 2009

The colors of my rainbow?

Saffron's blog caught my eye during this year's Tour de Fleece. She posted her colors of the rainbow today and it caught my eye. So, here are the colors of MY rainbow:

Your rainbow is strongly shaded brown, gray, and green.


What is says about you: You are an elegant person. You appreciate the roughness of nature. You feel closer to people when you understand their imperfections. Those around you admire your fresh outlook and vitality.

Find the colors of your rainbow at spacefem.com.

Do I agree? ummm, not necessarily. I don't choose brown - often. Then there is that vest I just made...Gray - I DO like Grey's Anatomy. As for green, I just adore it.

Go on over and see what your rainbow is colored!

Monday, November 02, 2009

Cough, wheeze

It has been one week since returning from the Kentucky adventure and we are still sick. Thankfully, FYS didn't develop symptoms before his tamiflu arrived. As for Hubs and I, we received the worse of it. This sickness packed a punch of headaches that threatened to blow the tops of our heads into oblivion. Never has a headache hurt so much and been affected by so little. Here I am, a week in, and it was the plan to go to my tennis group this morning. Heh, heh, it was not to be.


Last week did offer up opportunity to knit. In between the fever, chills, and exhaustion, there were projects flying off my needles.


First up, a lovely little vest knit for Nana's in Baton Rouge. It is knit in Lana Grossa Come on US 5 needles.


This vest has a lot going on with cables, eyelets, and an interesting neckline. I wish the unmodeled photos did it justice, it looks so much better on. The ribbing lays just perfectly and it accentuates without being snug. I will get some modeled photos up ASAP.


The back has nearly as much to offer as the front. If you haven't taken the time to look at this yarn, please do. It is incredible from the soft squishy way it feels in your hands to the drape of fabric that it makes.


Also, a finished pair of socks! Through the Loops hosted a Mystery KAL which was so fun to follow. One clue a week and finished socks by the end of October!


I used Lisa Souza Sock that was gifted to me too long ago. Now, I can think of my dear friend whenever I wear them.


Knit on US 1. If we finished and posted photos in the Ravelry group by 11/30, there was a chance for prizes!!!! I did, we shall see.

Off for a rest now. It turns out that blog posting can really take it out of me.